
Quilting Tips and Tricks: Mastering the Art of Patchwork
Do not get caught up in perfection with every quilt you make. Over time and with practice your quilts will get better. Instead enjoy the process, learn from it and try different ways and see what sits best for you. Quilting always has something new to offer even when you have been quilting for years. Try new techniques, try old techniques choose what works for you. In this blog I will put down a few of my basics which may or may not be news to you or, may or may not work for you.
Choose Good Fabric
This is a bit of a thing for me (maybe because I have a fabric shop!) But good quality quilting weight cotton fabric will help you no end towards getting the results you want. They are easier to work with and tend to hold up better over time. Poor quality fabrics tend to grow thin quickly and loose their colours and body. Pre wash? Ah the age old argument check out here for the pros and cons on pre washing quilting fabric.
Invest In Tools That Work For You
I say that work for you because once again this is a bit of a personal choice. A rotary cutter that is comfortable for you, I like this Olfa cutter because the blade is safely away when you let go of the handle. Change your blade when it gets dull (sometimes a roll across some tin foil will revive the blade for a little longer) a self healing cutting mat, again these can wear and start to feel rough which can affect the effectiveness of your blade. A little brush with some water and a nail brush can help keep them for longer. Keep the boards flat, if by chance you do warp the mat put it somewhere flat (a table, under the bed) with a pile of books or other flat heavy objects for a bit and it will soon come back into shape. Quilting rulers, there are a lot of quilting rulers out there! I have found a 6.5 inch square a 12.5 inch square and a 6 by 24 inch are the most useful. Do think about the colour of the markings and the thickness of the lines (finer is easier to navigate) and make sure the ruler in in inches rather than centimeters as patchwork is almost always done in imperial.
Accurate Cutting
I am going to say that again “accurate cutting” is fundamental in patchwork. The old adage measure twice cut once is absolutely true in patchwork and quilting. Make sure you are standing over the ruler so you can see the measure lines clearly. Ensure you are holding your rotary cutter straight against the ruler as if you lean inwards or outwards the piece will be too big or too small. This will cause problems later when you are piecing. Take your time don’t rush this step.
Organize Your Workstation
This feels like a prim piece of advice but a messy workspace can lead to trouble. Keep your tools and supplies organized and within reach, come up with a system for yourself I find a pin cushion attached to my machine keeps them to hand and in order. A machine mat with pockets is great for snips and small pieces of equipment. A fold away table covered with foam and fabric for a pressing station with a travel iron next to where you sit makes pressing a dream.

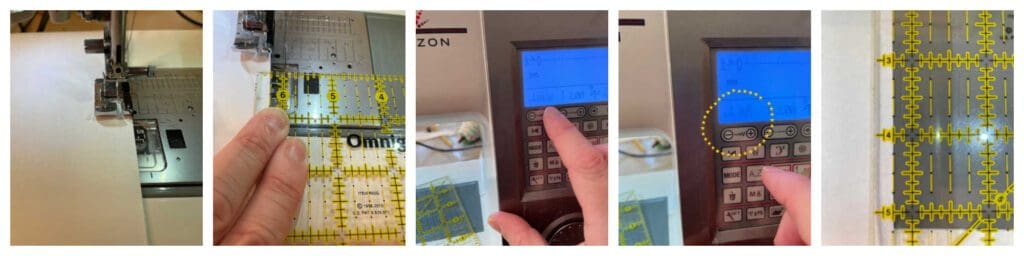
Check The Accuracy Of Your Seam Allowances
Good accurate seam allowances are so important for making everything match and easy to sew. Invest in a 1/4 inch machine foot for your sewing machine to help you to keep those seams accurate. When the foot arrives don’t just trust it’s a quarter of an inch! Use a piece of paper and pretend it is your fabric, stitch a couple of stitches take it out and measure the distance from the perforations to the edge of your paper with your quilting ruler to see if it is accurate or not. If not you will need to move your needle (if you can, not all machines allow you to do this) usually it involves the width on the zig zag being adjusted as this moves the needle.
Chain Piecing
Chain piecing means you don’t stop trim your thread and start again. Chain piecing means you stitch your pieces and bump the next piece into the machine with just a stitch or two sewn on nothing inbetween. When you finish you will have what looks like a bunting of piecing. Trim between each piece and you will have a nice pile of piecing. This technique saves both time and thread as you are not pulling thread through to start and stop. If you would like to save even more on thread check out my Gutermann thread club.
Press Don’t Iron
This takes a bit of getting used to as we are all used to ironing but in patchwork we use the iron in a very different way. When setting your seams or pressing open seams, use an up and down pressing motion (lifting the iron up and down rather than sliding the iron) By doing this you avoid stretching the fabric.
Matching Seams And Points
The holy grail in patchwork is the perfectly matched point, having said that don’t get to worried about this as a mismatched point on a whole quilt will not be particularly noticeable. To aim to create perfectly matched seams and points, use pins that are long and slim with a flat head (this means the fabric lays flatter and is not distorted as much by the pin) You could go the belt and braces way and use basting stitches to hold your pieces together before sewing. Taking the time at this point will really help you to get the result you are craving.
Consider Spray Basting
When I first started quilting we secured the three layers together with a tacking stitch every six inches or so. A very slow and dull job on your own but quite fun if you get a few friends to help you as it’s a great thing to do while chatting. When layering your quilt sandwich (top, wadding and backing) try using a basting spray like 505 it holds everything together nice and securely but is movable if you get a pleat or tuck. I would advise doing outside or in a well ventilated room. If you have a large quilt consider hiring a local hall for an hour or two with a friend and bast all the quilts you need. The spray holds for a good long time, I have a quilt that has been together for several years and is still holding strong.
Experiment With Quilting Designs And Techniques
The quilting can make or break your quilt. Experiment with different ways of quilting. My favourite is hand quilting, not for everyone I appreciate. Straight line quilting with a walking foot which gives a modern effect. You can of course do curves with a walking foot too. If you have a wavy line fancy stitch on your machine that works well. When machine quilting remember to increase the size of your stitch by a little as you are going through quite a thickness and the stitches will become smaller. Free motion is another option and I would say needs a little more practice than the others. For an on line course check out the Crafty Nomad, it is a very informative course.
Proper Binding Technique
A neatly bound edge is like a frame for your quilt. Binding finishes the quilt and encloses all the raw edges that are around your quilt. I often make my binding with left over fabrics from my quilt. There is a full tutorial here.
Embrace Mistakes
Mistakes happen to all of us, especially when you are starting out. Don’t let this discourage you, you learn best when you make mistakes. Sometimes the mistakes make for a creative design alternative!
Join A Quilting Community
There are lots of quilting community’s and it can be a very social hobby indeed. Find your crowed at a local group or shop, just ask around and I am sure you will find somewhere if not why not set up a group of yourself? With the internet you can find lots of different groups to join. I have found Facebook and Instagram particularly good, you may even find a local group this way.
Remember quilting is a hobby to be enjoyed. You will never stop learning ( I know I have said that before) Practice really is the best approach, patience will be required, walking away for a bit is perfectly acceptable. Each quilt you make will be a learning opportunity. Please remember these are tips to try you may find other things that work better for you. If you have any top tips please feel free to add I would love to see and learn from you too.
Happy Quilting
Mary
2 Responses
Excellent advice Mary and thank you for sharing.
Learnt lots from the mistakes but makes the end quilt personal to me.
A great way to look at it Denise, thank you for commenting. Mary